With a certificate of conformity you receive a statement whether the balance corresponds to your defined requirements. In combination with a calibration certificate with accreditation symbol it serves as a documented confirmation that the balance fulfills the demanded requirements. The process responsible can choose from different tolerance specifications - depending on their individual demands.
Certificate of conformity based on the measurement uncertainty in use
("accuracy in use")
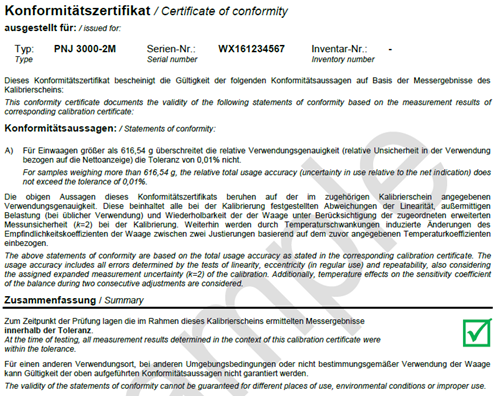
| The appendix on the uncertainty of measurement in use ("accuracy of use") to the calibration certificate makes a statement on the uncertainty of measurement to be expected by the user for each sample quantity in the (calibrated) measuring range of the balance. This measurement uncertainty includes the measurement uncertainty of the measured values determined during calibration and also takes into account additional uncertainty components during use (e.g., the temperature drift of the balance). The certificate of conformity can be issued on the basis of a relative (percentage) or absolute (in mg, g, kg, etc.) tolerance. Since the relative uncertainty of measurement of a weighing increases with decreasing load, a relative tolerance specification results in a sample quantity below which the desired relative uncertainty of measurement is exceeded. This is known as the minimum sample quantity. Thus, in the example shown, with a tolerance of 0.01%, the minimum sample weight is 616.54g - below which the relative uncertainty of measurement of the sample weighed would be greater than 0.01%. |
 |
| KERN |
Option: conformity assessment based on the uncertainty of use |
Sample certificate | Price |
|---|---|---|---|
| 969-511 969-512 |
as a supplement to the cal. certificate with accr. symbol (relative) as a supplement to the cal. certificate with accr. symbol (absolute) |
Accuracy in use relative Accuracy in use absolute |
on demand |
Certificate of conformity based on the calibration results
|
During calibration, the display deviation of the balance is determined at, for example, five test points. Each determined display deviation is assigned a measurement uncertainty, which includes, for example, the accuracy of the test equipment used. |
 |
| KERN | Option: conformity assessment based on the calibration results | Sample certificate | Price |
|---|---|---|---|
| 969-513 969-514 |
as a supplement to the cal. certificate with accr. symbol (relative) as a supplement to the cal. certificate with accr. symbol (absolute) |
Calibration results relative Calibration results absolute |
on demand |
Certificate of conformity based on the measured values
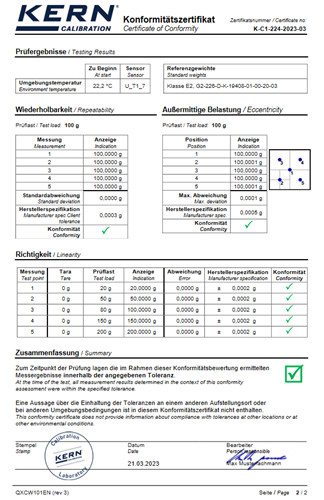
| During calibration, various characteristics of the balance are checked, e.g. off-center load, repeatability, accuracy. The certificate of conformity shown here makes a statement about these individual measurement results before they are included in the total measurement uncertainty. This allows, for example, to check manufacturer's specifications, but not to make an overall statement about the measurement uncertainty of future weighings. The measurement uncertainty of individual parameters cannot be taken into account. Only the direct measured values (accuracy, off-center load and/or repeatability) are compared with the specified tolerances (manufacturer's or customer's tolerance) without taking into account the uncertainties. The certificate of conformity can be issued on the basis of a relative (percentage) or absolute (in mg, g, kg, etc.) tolerance. |
 |
| KERN | Option: conformity assessment based on the measured values | Sample certificate | Price |
|---|---|---|---|
| 969-515 969-517 969-516 |
as specification of manufacturer (other manufacturers) as specification of manufacturer (KERN) as specification of customer |
Specification of manufacturer/customer Specification of manufacturer/customer Specification of manufacturer/customer |
on demand 23,- on demand |


