Determining the hardness of metals is of particular significance during the preparation and use of metallic materials. Traditionally, hardness is determined using test machines in accordance with Vickers, Rockwell or Brinell.
Since 1978, a rebound test was used for the first time for mobile measuring, in accordance with Dietmar Leeb. To do this, a standardised impact body is shot against the item to be tested. The rebound of the imoact body leads to a deformation of the upper surface, which results in a loss of kinetic energy. This loss of energy is determined by measuring the speed and herefrom the Leeb hardness value (HL) is calculated.
Every electronic measuring device will only give correct results if it is checked regularly, i.e. calibrated correctly and adjusted when required. An electronic measuring device is only a reliable measuring and checking tool if it is calibrated and this calibration is documented as part of a quality procedure.
We are pleased to offer you the factory calibration of Leeb hardness testers for the measuring range of 400 - 800 HLD in our ultra-modern laboratory within fastest processing times (4 working days).
This is not an accredited calibration (no proof of metrological traceability).
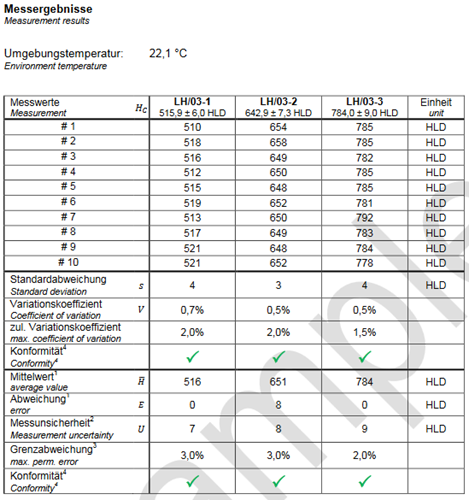
Content of the calibration certificate
At the following you will exemplary see a detail of the taken values. You will find the complete sample certificate here.

Pricing summary
The prices for the calibration of Leeb hardness testers are as follows:
| KERN | Measurand | Measuring range |
Price € |
|---|---|---|---|
| 961-170 | Hardness Shore |
For sets up to 7 plates |
138,- |
| 961-131 | Hardness tester Leeb | 400 - 800 HLD | 174,- |
| 961-132 | Hardness Leeb |
Test block (for Leeb durometer) |
174,- |
| 961-270 | UCI hardness testing devices | 207HV, 396HV, 673HV | 375,- |
| Additional services | |||
| 962-116 | Calibration express service with 48 hour delivery |
55,-/ Instrument |
|
| 969-003R | Preparation for calibration (cleaning, function test) |
27,- | |
This is not an accredited calibration (no proof of metrological traceability).


